


PEMP Car Audio
PEMP(6283D) E83 Android 13 10.25" IPS Touch Screen, Snapdragon 8-core 8G+128GB, CarPlay Android Auto for BMW X3 (2004-2010)
- Regular price
- $610.00
- Sale price
- $610.00
- Regular price
-
$0.00
Shipping calculated at checkout.

$0.00
$69.00

$19.90

$0.00
$23.90
Return to your nearest address. (USA and Europe)


Intelligent Interconnection
Support wired and wireless
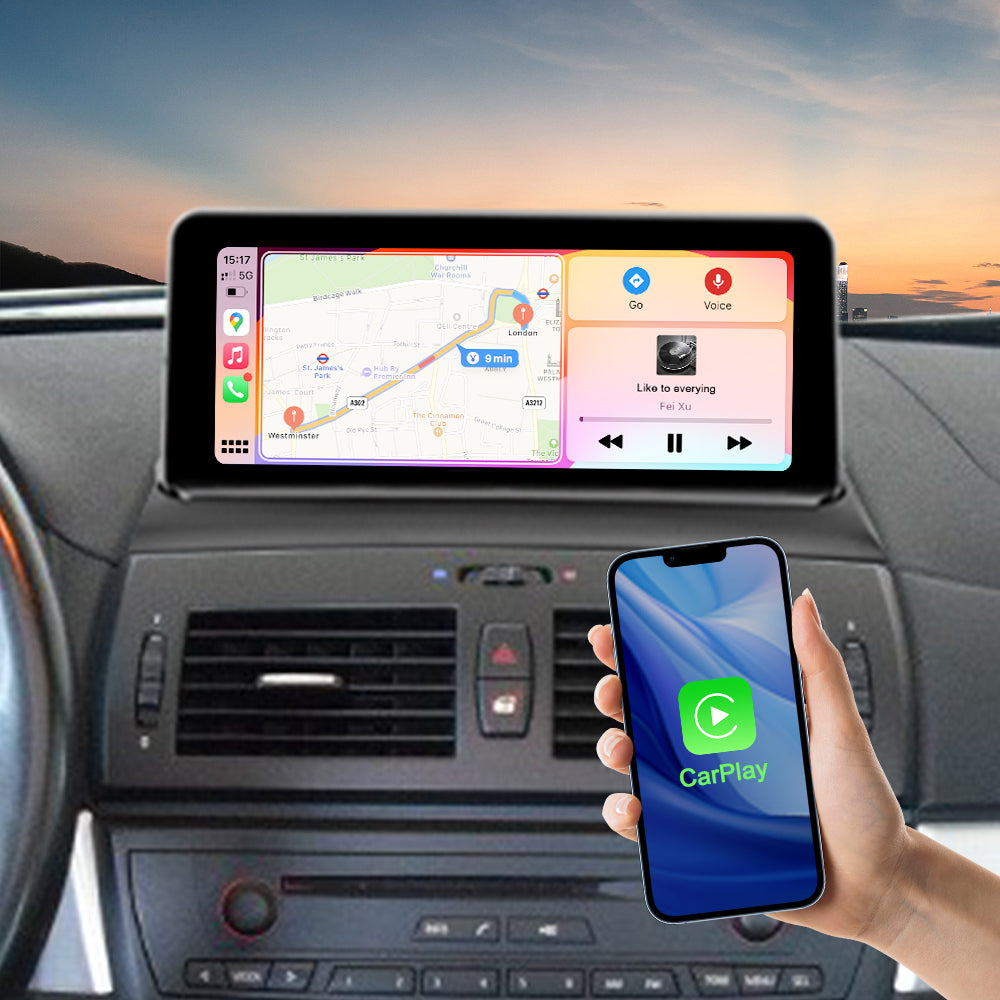
Wireless and wired Carplay for bmw e83
Built-in wireless and wired Carplay, Wired CarPlay need connect the USB IN 1.
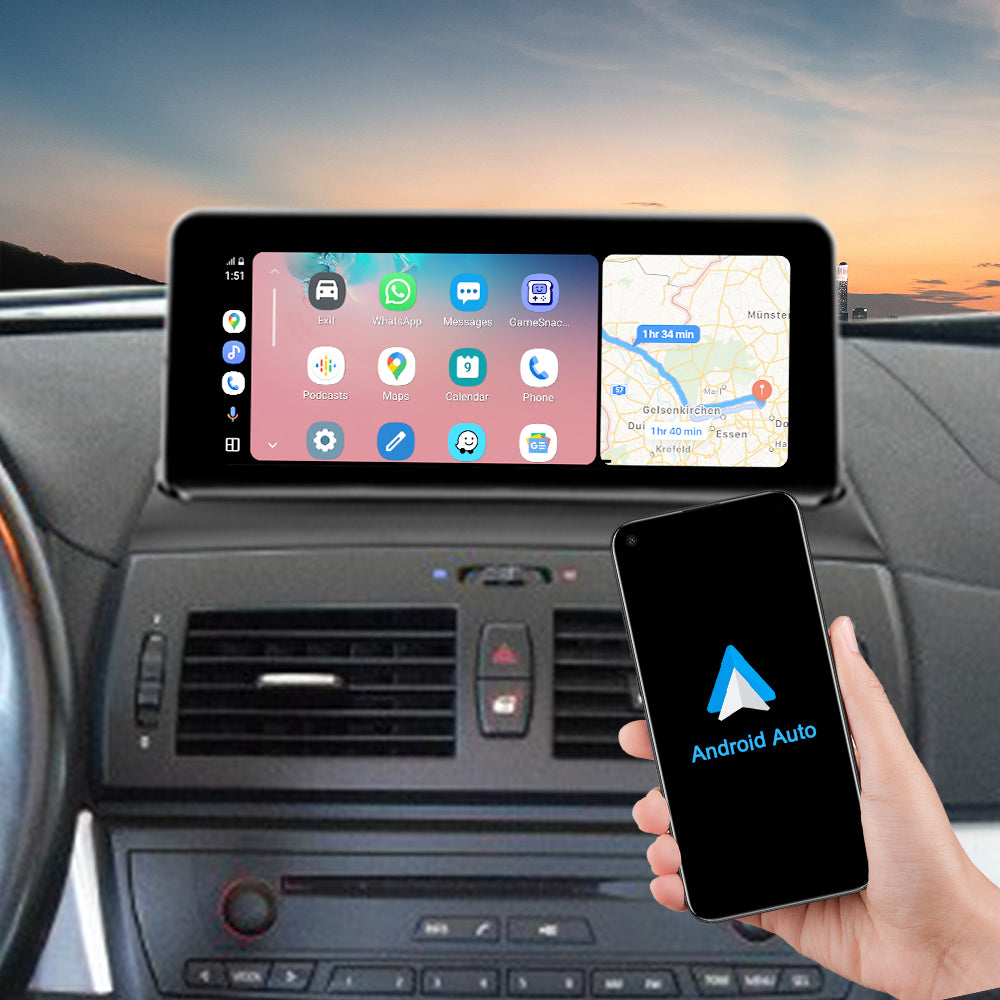
Wireless and wired android auto for bmw e83
Built-in Wireless and Wired android auto, Wired Android auto need connect the USB IN 1.

Wired and wireless Mirror link for bmw e83
Built-in Wired and wireless Mirror link, Wired Mirror link need connect the USB IN 1.
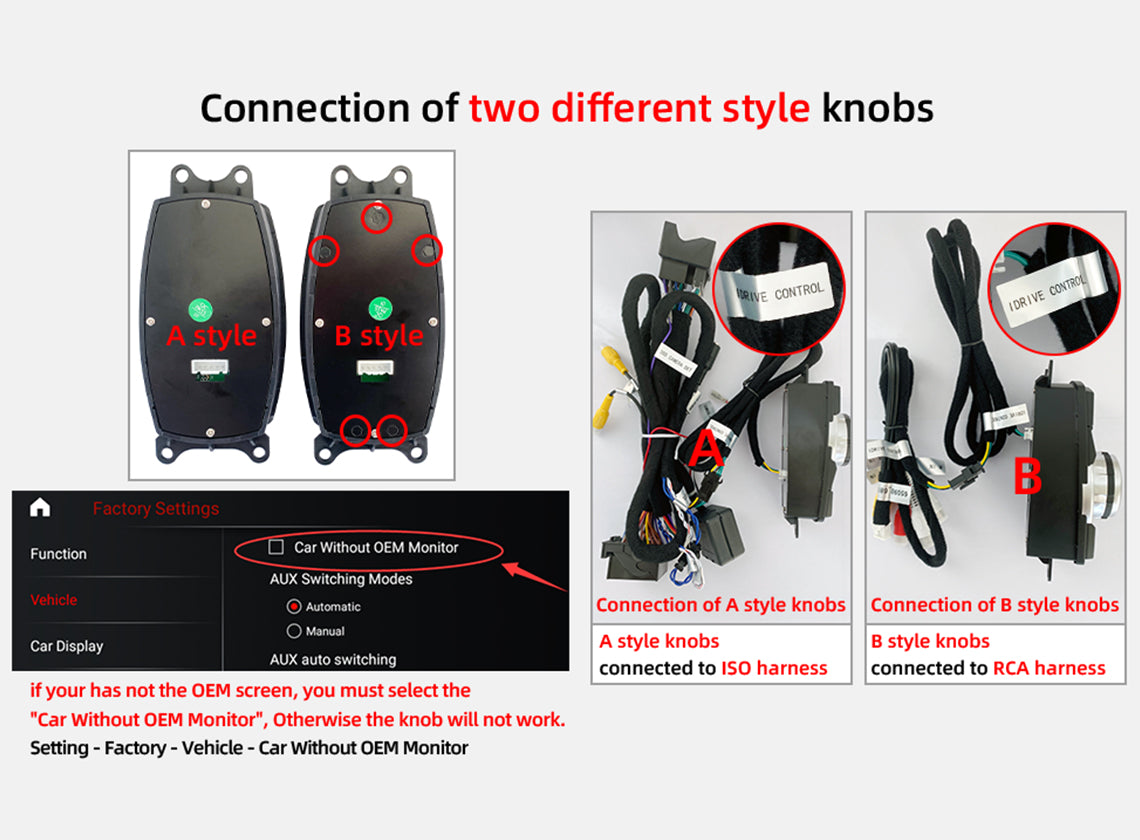
Connection of two different style knobs
A and B knob connection method
1. If your knob is type B, please connect it to the IDRIVE CONTROL interface on the RCA harness; 2. if your has not the OEM screen, you must select the "Car Without OEM Monitor", Otherwise the knob will not work.
Product Installation and Setup
Approaches to common problems

This one support the oem screen and oem without screen
1. If your original car has the OEM screen, install PEMP Android, and it can display the original car's entertainment navigation information. 2. If your original car does not have OEM screen, please select original car without screen in the settings.

Pls check E83 aux menu on the OEM screen
Please confirm the aux menu before purchase. If the OEM car radio does not have an aux menu, Please buy FM transmitter to solve the sound problem. Otherwise you can't get the sound of Android.

Set the Without OEM Monitor
If your original car has no OEM screen, after installation, the original car information will display “NO SINGLE”. You need to set the path as follows: Settings > Factory Settings > vehicle > car without OEM monitor, Choose it. After setting OK, the original car information will display a time interface.

Remove the fiber optical to the Android Harness
Otherwise you can't get the original car information and the sound of the Android. And accompanied by heartbeat wheezing sound.
You May Also Like
IN THE BOX
Frequently Asked Questions
Pre-Sales FAQ
Answer your pre-sales questions
- PEMP screen products are abundant, if you want to buy the right PEMP screen for your car, you need to know which kind of OEM system your car has first.
- Below we'll cover the differences and appearance of the 4 common BMW screen systems:
- 1. The CCC system is used in older models, with a simple display interface and four functions, communication, Climate, navigation and Entertainment, that can be distinguished at a glance.
-

- The CCC LVDS cable is a 10 PIN LVDS cable:
-

-

- 2. The CIC system, with significantly more features than the CCC, is arranged in a vertical list. Maps, phone, radio, navigation, CD, etc. are available, and you can set options and view vehicle information at the same time.
-

- The LVDS cable used in the CIC system is a 4 PIN LVDS cable:
-

- The NBT system is still arranged in a vertical list and begins to have a connected driving function as well as a mobile office, and the system is more technological compared to the CIC detailing with highlights and shadows.
-

- NBT uses a 6 PIN LVDS cable
-

- 2. The EVO is arranged horizontally for a richer functionality and an easily recognizable system UI.
-

-

- EVO system still utilizes the 6 PIN LVDS connector.
-

- This content describes in detail the difference between Android screen and LINUX, I believe you will have a clear understanding of them after reading all the content, and then according to your needs to buy the right screen for you.
- You can also copy the video link to your browser off to see the detailed video tutorial:
- https://youtu.be/wReZG_1Aajo
- Or scan the QR code of the video to watch it:
-

- Below is a general overview of the differences between the Android screen and the LINUX screen:
-

- Points of difference:
- Difference 1: Start-up speed difference
- Android screen startup time is about 35 seconds,
- LINUX screen startup time is about 9 seconds.
-

- Difference 2: Price difference
- Android screens are relatively expensive due to their functionality and highly regulated configuration.
- LINUX screens are relatively simple in terms of functionality and configuration and are relatively inexpensive.
-

- Difference 3: APP Download and Installation.
- Android screen supports downloading APP and installing,
- LINUX screen can't download APP and only supports using some APP by connecting Carplay and Android Auto.
-

- Difference 4: SIM card and TF/SD card difference
- Android screen has built-in SIM card and SD/TF card slot, support using SIM card network and TF/SD card memory expansion.
- LINUX screen has no SIM card and SD/TF card slot, does not support SIM card and TF/SD card function.
-

- Difference 5: Built-in navigation .
- Android screen with built-in navigation, support for connecting GPS antenna, you can use the navigation directly without connecting the phone.
- The LINUX screen does not have built-in navigation and does not support the connection of a GPS antenna; navigation must be used through the phone with Carplay and Android Auto connected.
-

- Difference 6: Memory Difference
- Android screens support the selection of memory configurations.
- LINUX screens do not support the selection of memory configurations.
-

- Difference 7: Antenna and installation difficulty.
- Android screen support GPS and SIM card, standard equipped with GPS and 4G antenna, the installation of the GPS and 4G antenna need to find the location of the installation and the location of the cable, the difficulty of installation is relatively difficult.
- LINUX screen does not support GPS and SIM card, do not need to install GPS and 4G antenna, the difficulty of installation is relatively easy.
-

- Difference 8: CPU difference
- Android screen uses a Qualcomm processor,
- LINUX screen uses a Sunplus processor.
-

- Difference 9: Aftermarket Reverse Camera
- Android screen supports installation of 1080P and 720P AHD/CVBS aftermarket reversing cameras.
- LINUX only supports to install 720P aftermarket reversing camera.
-

- Similarities:
- Similarity 1: Intelligent Connectivity
- Both Android and LINUX screens support wireless and wired Carplay & Android Auto connectivity.
-

- Similarity 2: Dual system switching
- Both Android and LINUX screens support OEM systems as well as quick switching between corresponding aftermarket systems (Android/LINUX).
-

- Similarity 3: Camera and Radar .
- Android screen and LINUX screen both support OEM reverse camera and radar display.
- Android screen and LINUX screen both support installation of aftermarket reverse camera.
-

- Similarity 4: Same screen specs.
- Both the Android screen and the LINUX screen use touchscreens of the same size and resolution.
-

After-Sales FAQ
Answer your pre-sales questions
- If you experience abnormal sound problems, you can check the screen and cables one by one by following the steps in this document.
- You can also copy the video link to your browser off to see the detailed video tutorial:
- https://youtu.be/QKJVoJlUpiU
- Or scan the QR code of the video to watch it:
-

- Step 1: Click CAR INFO on PEMP home page to enter the OEM system, check whether the OEM system can be displayed normally.
-

- Step 2:If the OEM system displays abnormally, refer to the documentation on how to handle abnormal OEM system displays or contact Customer Service.
-

- Step 3: If the OEM system displays properly,press the FM/AM button and check that the radio is producing sound.
-

- Situation A: If there is no sound from the radio after pressing the FM/AM button .
- Please refer directly to the method of B-7 and B-8 in case B to check your cables.
- Situation B: If the radio sounds when the FM/AM button is pressed .
-
- B-1: If there is sound coming from the radio, click Multimedia-External Devices, then select Multimedia Mode as AUX Front.
-

- B-2: If you are connected to OEM Bluetooth, disconnect OEM Bluetooth and delete the connection history.
-

- B-3: Set AUX auto switching to off.
- If you have a Qualcomm 680/685 screen, the setup path is Settings - System - AUX Settings.
-

- If you have a Qualcomm 662/8953 screen, the setup path is Settings - Factory - 070305 - Vehicle - AUX Switching Modes.
-

- B-4: The default sound of AUX mode is rather low, please try to adjust the sound greatly by using the sound adjustment knob.
-

- B-5: Connect one end of the supplied AUX cable to the AUDIO OUT port on the IOS harness; The other end connects to the car's AUX IN (usually located at the armrest box).
-

- B-6: Some cars have fiber optic cable on OEM ISO harness, if your OEM ISO harness has fiber optic cable, please transfer it to PEMP ISO harness.
-

-

- B-7: Check the ISO harness plugs and re-unplug and re-insert the plugs .
-

- B-8: Check the power cable and LVDS cable on the back of the screen and unplug and re-plug them.
-

- If you are experiencing problems with your OEM system displaying anomalies, you can check your screen and cables one by one by following the steps shown in this document.
-

- You can also copy the video link to your browser off to see the detailed video tutorial:
- https://youtu.be/dxED9pfNt08
- Or scan the QR code of the video to watch it:
-

- Step 1: Press the FM/AM button and check the radio for sound .
- A: If you can hear the FM sound, please go to the PEMP system homepage, click “Settings” - “Factory Settings” - "070305" - "Vehicle display" and "CAN Protocol" , and select the vehicle protocol and resolution Select the option that corresponds to the OEM system.
-

-

- B-1: If the OEM screen still doesn't display properly or you can't hear the FM sound, you need to check if there is a fiber optic cable on the plug of the OEM ISO harness, and if there is, you need to transfer it to the PEMP ISO harness.
-
- B-2: Because the plug is designed to be tight in order to prevent the plug from loosening, it is easy for the ISO plug to not be inserted to the end and have poor contact.
- Therefore, we need to unplug the ISO plug, and then re-insert it, you can use a little force when inserting, please make sure that the plug is completely inserted to the end.
-

-

- B-3:Then check the LVDS cable behind the screen and the white power plug.
- As some cars have less space to install the screen, it is easy for the cable to be squeezed, which can lead to loose plugs and poor contact.
- So we need to unplug and re-plug the cable and make sure it is fully inserted and that it is not pinched when installing the screen.
-
